Hey freaks, Welcome again to Freaky Diodes. We are back with another awesome electronics project. In this project, we have made a 5W Stereo Amplifier For Noise Free Music. It is a very simple and easy project. This simple 5W stereo audio amplifier is based on an IC TA8207K of 12-pin and requires a couple of few resistors, electrolytic & ceramic capacitors. The output power of about 4.6W for the left and right channels is given using a 12V DC supply.
Also Read: Heart Rate Monitor Using Arduino
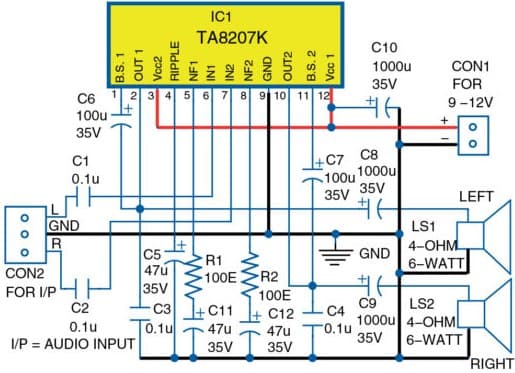
Circuit Diagram of 5W Stereo Amplifier :

Working & of Stereo Amplifier :
As shown in the circuit diagram the connections of Stereo Amplifier are as follows:
- The 3rd & 12th pins of TA8207K IC1 are connected to the positive terminal of the battery.
- The 6th & 7th pins of the IC are used for inputs of left & right audio.
- A pot of 100-kilo-ohm can be connected for volume control for each input of the amplifier.
- The LS1 & LS2 are the loudspeakers connected to pins 2 & 10 of IC1 through electrolytic capacitors C8 & C9.
- The C10 electrolytic capacitor is connected between +12V and ground. It works as a noise filter.
Also Read: Electronic Mosquito Repellent
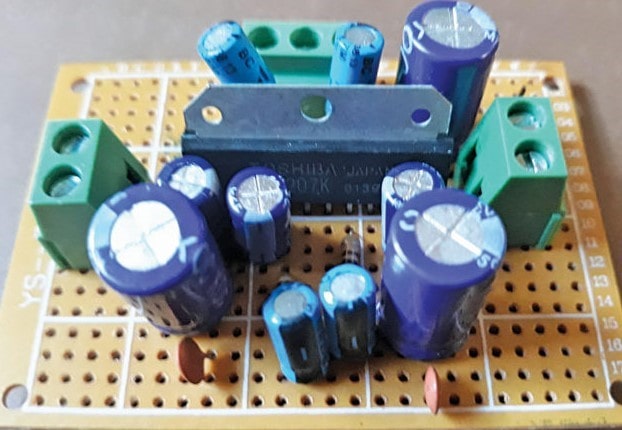
- This amplifier can be implemented on a 5cm×6.5cm Veroboard, or on the PCB whose layout is given.
- The TA8207K IC can be vertically inserted into the Veroboard or PCB.
- Assemble the circuit and connect the audio input from the source, across CON2 and the LS1 & LS2 two speakers.
- Now, connect the 12V battery across CON1.
Also Visit: Latest Jobs, Interships & Off-Campus drives
Connect the two speakers and 12V battery to the amplifier. Touch it gently with the screwdriver on any of the inputs at the 3-pin connector (CON2), a humming sound coming from the speakers.
Now, connect the audio output of source of signal to CON2 and we get the noise-free amplified music.
For more electronics projects visit our website regularly and don’t forget to join our social media groups for the latest updates of jobs, internships & projects.


