

Hey Freaks, Welcome to Freaky Diodes again, here we are back with another awesome electronics project. We are going to make a Low-cost Racing Drone. As we all the drones are very expensive, generally starts from 25K to 75K, these prices makes many of us afford it and as we are new to drone our biggest fear is if during the flight if the drones get crash or broken, and replacement of the parts is expensive.
So, we have made a Low-cost Racing drone with 2200kv 6T Motor and CC3D Open Pilot Flight Controller with a Qav250 frame and 6045 i.e. a 6-inch propeller. This combination makes it a perfect low-cost Racing Drone. This would cost under 15K only and the best thing is that we can upgrade with high-performance part whenever we want.
List of Required Components –
| Components | Quantity | Buy From Amazon |
|---|---|---|
| QAV250 Drone Frame | 1 | Buy Now |
| 3c11v Lipo 3300 mah Battery | 1 | Buy Now |
| Flysky CT6B Radio Transmitter & Receiver | 1 | Buy Now |
| 2200Kv Motor 6T A2212 Motor | 4 | Buy Now |
| 6045 Propeller CC/CCW | 4 | Buy Now |
| 30/40A ESC | 4 | Buy Now |
| CC3D Flight Controller | 1 | Buy Now |
| XT60 Connector | 1 | Buy Now |
| AA Alkaline Battery | 8 | Buy Now |
Assembling Of Qav250 Racing Drone –
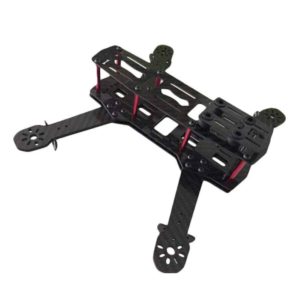
Frist thing to make the drone is to assemble the drone frame. The QAV250 drone frame kit consists the following parts –
- 2 base plates & 4 arms for motor
- 1 top plate & 4 landing gears
- Now, put all the 4 arms in between the 2 base plates and screw them.
- Add the landing gears in the arm and fix the top plate on base plate.
- Now the drone frame is ready to equipped. See the image below-
Now, connect the Power distribution board along with the XT60 Plug with ESC wires. According to the image below –
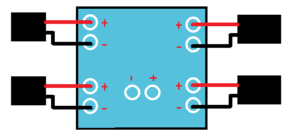
Now put the power distribution board in the middle done frame QAV250, and fix the ESC wire on all four arms of the drone.
Connections of Qav250 Racing Drone –
- Connect the ESC wire (having 3 side) to motor to third motor wire with all four ESC and motors.
- Connect the CC3D flight controller pins matching the +ve and -ve with ESC 3 wire Servo type pin.
- Connect PWM Signal to Yellow and GND connect black +ve connect to +ve red of ESC wire.
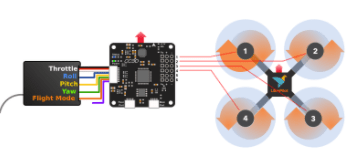
- Now, Connect the CC3D Flight Controller to Radio Receiver as shown in the image below –
Programming of CC3D Flight Controller –
The programming of CC3D Flight Controller can be done with both LibrePilot GC or Open Pilot GCS, you can choose any of them.
Here we have chosen the Open Pilot GCS. Now open the Open Pilot app and connect the CC3D to pc with a usb cable and click on vehicle setup wizard.
Now choose to update the firmware by selecting Upgrade and then wait.
Now you will get a window where you have to enter ACC calibration. Place the CC3D Flight Controller on a flat surface in a way it facing towards the front motor. Now calibrate the Motor ESC and accelerometer as per the instruction. Disconnect Power Distribution Board from Battery.
Click on start and wait for a beep sound from motor, repeat the same procedure once again. Now The ESC is calibrated.


